Hi, friends,
Today I'm going to bring with Springy printable traveler's notebook papers. Click here for everything that's new in the shop.


Thank you for standing by.
Hi, friends,
Today I'm going to bring with Springy printable traveler's notebook papers. Click here for everything that's new in the shop.
Hello, everyone! I can't believe it's already in April!
I still spent lots of my time to make my design into digital. As you can see, I make twelve breakfast printable traveler's notebook papers. Click here for everything that's new in the shop.

Hello crafty friends! Today I'd like to share a bit of inspiration. I visited Taipei ZOO last month and had a photo with the big cake celebrating Taipei ZOO’s 106th! The March kit and add-ons were perfect for recording this exciting moment!

Supplies | March 2021 Kit, March 2021 Labels, Happy Birthday Journaling Tags, Happy Birthday Chipboard Stickers, Tiny Shapes and Dots Puffy Stickers – Cool Tones, Happy Birthday Wood Veneers, Hooray Wood Veneer Banners, Large Acetate Numbers, Acrylic Balloons and Presents, Celebrate 6 x 8.5 inch Paper Stack, Make a Wish Stamp, Happy Birthday Metal Die, Parker Alphabet Metal Die, Hugs and Kisses Stamp
I started by adding a bit of pink watercolor to the background—just a soft application to two areas in the page. I really love the Make a Wish Stamp, so I used words and patterns to fill part of the background to add more texture.

I positioned my photo on the bottom right corner and layered it using the Happy Birthday Journaling Tags. I knew I needed more layers and embellishments because my background is soft and white. I tore patterns from the from Celebrate Paper Stack and wrinkled them to give more texture. I also tucked a piece of tissue paper between the papers to soften the layers.
I embellished with journaling tags from the March 2021 Kit, Happy Birthday Chipboard Stickers and March 2021 Labels.

The “cheers” banner from Hooray Wood Veneer Banners is super cute and perfect for decorating a birthday layout! I also added the dark blue Tiny Shapes and Dots Puffy Stickers for more interest.

My favorite part about creating this layout was building my title. There are not enough words to describe just how much I love the alpha products from Elle’s Studio! And I have to say that the Large Acetate Numbers and the Parker Alphabet Metal Die are AWESOME! I used them to create my title and I got the stitched look by using the Hugs and Kisses Stamp. It helps my title stand out on the background and gives it a little contrast and depth. I just love how it turned out.
The “Happy Birthday” is from the Make a Wish Stamp and Happy Birthday Metal Die.

For finishing touches, I added some of the cute Acrylic Balloons and Presents pieces and Happy Birthday Wood Veneer balloons.
I really had a lot of fun with the March kit and add-ons and I think the possibilities for the kit are endless! I hope this projects has inspired you to use the kit to create a project of your own. Happy creating!
Hello friends! Today I'm up on Elle's Studio blog sharing a bit of inspiration using the Elle's Studio February kit and add-ons.

Supplies | February 2021 Kit, Here’s the Story Printables, February Labels, Jane Tile Alphabet Cardstock Stickers – Pink, Happy Little Moments Chipboard Stickers, Purple Puffy Alphabet Stickers, Heart of Gold Wood Veneers, XOXO 6 x 8.5 Inch Paper Stack, Tiny Acrylic Hearts, Good Times Tab Stamp, Noted Vol. 3 Stamp

I printed out my photos and positioned it on the left side of the page and layered it using the February 2021 Kit. The delightful colors and patterns were perfect to add to this layout without taking the focus away from my photo. I also grabbed a piece of little black heart paper from XOXO Paper Stack and one pink February Label to tuck under the photo. Then, I embellished the layers with Happy Little Moments Chipboard Stickers, pink Jane Tile Alphabet Cardstock Stickers and the adorable Tiny Acrylic Hearts. I also added some tangled thread in a neutral color, adding some great texture to the layout.

On the right side of the page, I focused on using the February 2021 Kit journaling tags and Here’s the Story Printables.
A tag embellishment cluster is one of my favorite decorations to add to any scrapbook layout. Not only are tags a great base for a cluster, but they are easy to make. I used a scissor and punch to make these tags from kit journaling tags and Here’s the Story Printables. I placed two tags on the center of the page, and added others on the top and bottom. Each tag serves as a grounding element for all the other embellishments, so they aren’t floating on the layout.
The sweet “one of a kind” Heart of Gold Wood Veneer piece really helped me to remember the mood of the photo. Also, the Purple Puffy Alphabet Stickers and Happy Little Moments Chipboard Stickers were a great way to add to the cluster without making the layout too heavy. They are my new favorite! I have to admit I loved using the different elements to complete my title.

Of course, I also had to add tags to my left side of the page to bring the whole layout together.

To add a few more details to my pages, I added stamping by using the Noted Vol. 3 and Good Times Tab Stamp. To finish off, I used the paper scraps that was left over from making tags to embellish and bring the whole layout together.
The lovely journaling tags and embellishments from this month’s release made it really easy for my layout to come together. I really hope this project has inspired you to use the February kit and add-ons to create a project of your own.
Happy creating!
Hey, friends! I am here today sharing a traveler’s notebook layout using Elle's Studio beautiful January kit and add-ons.

I loved the light gray color and the blank lined pattern paper from XOXO 6 x 8.5 inch Paper Stack and decided to use it as my background.


The light green tag is also from the January kit. I thought its color matched with my left side of the page, but there was not enough space on the right side to put the whole 3″ x 4″ journaling tag, so I trimmed it to be a tag. Then, I stamped some works from Daily Tabs Stamp. This stamp set is perfect for adding journalings in layouts,traveler's notebooks and pocket pages!

I really wanted to add some stamping to my background, so I stamped some hearts and little words from Hugs and Kisses Stamp randomly on both pages to get more texture and bring the whole layout together.
For the finishing touch, I added the adorable Puffy Heart Stickers and All My Heart Wood Veneers to my layout.
Just love how this traveler’s notebook layout turned out. I hope this has inspired you to use the January kit and add-ons to document your memories.
Thank you!
Hey, friends! Today I would like to share this traveler’s notebook layout using beautiful Elle’s Studio January kit, add-ons and cut files.


Just love how this traveler’s notebook layout turned out. I hope this have inspired you to use January kit and add-ons to document your memories.
Supplies: Elle's Studio 2021 January kit January 2021 Cut Files Hugs and Kisses Stamp XOXO 6 x 8.5 inch Paper Stack Love You Chipboard Stickers Puffy Heart Stickers True Love Stickers
XO,
Wei Wei


Hi friends, Merry Christmas!
Today I'm up on Chibitronics blog with this light up shaker page in my December daily.
let's take a look at my finished page:

As you'll see above my page is very fun and easy to do. I first printed my traveler’s notebook pages. When I saw this snow ball paper, I know I will make a shaker. I cut out those three snow balls as my shaker windows and then backed with a piece of acetate to cover those windows.

I created a parallel circuit on my foundation page. After applied the copper tape, I added blue, red, and white LEDs. Then, I covered my circuit with the snow ball images that I cut out before. I’m not afraid that covering the circuit affects the LEDs lighting effect because paper is thin so the LEDs can light through easily.


Next, I added some shaker elements and I adhered the shaker windows and foundation page with 3 D foam tape. This was seriously so fun to make and just made me happy while making it.

That is all from my side today. Thank you.
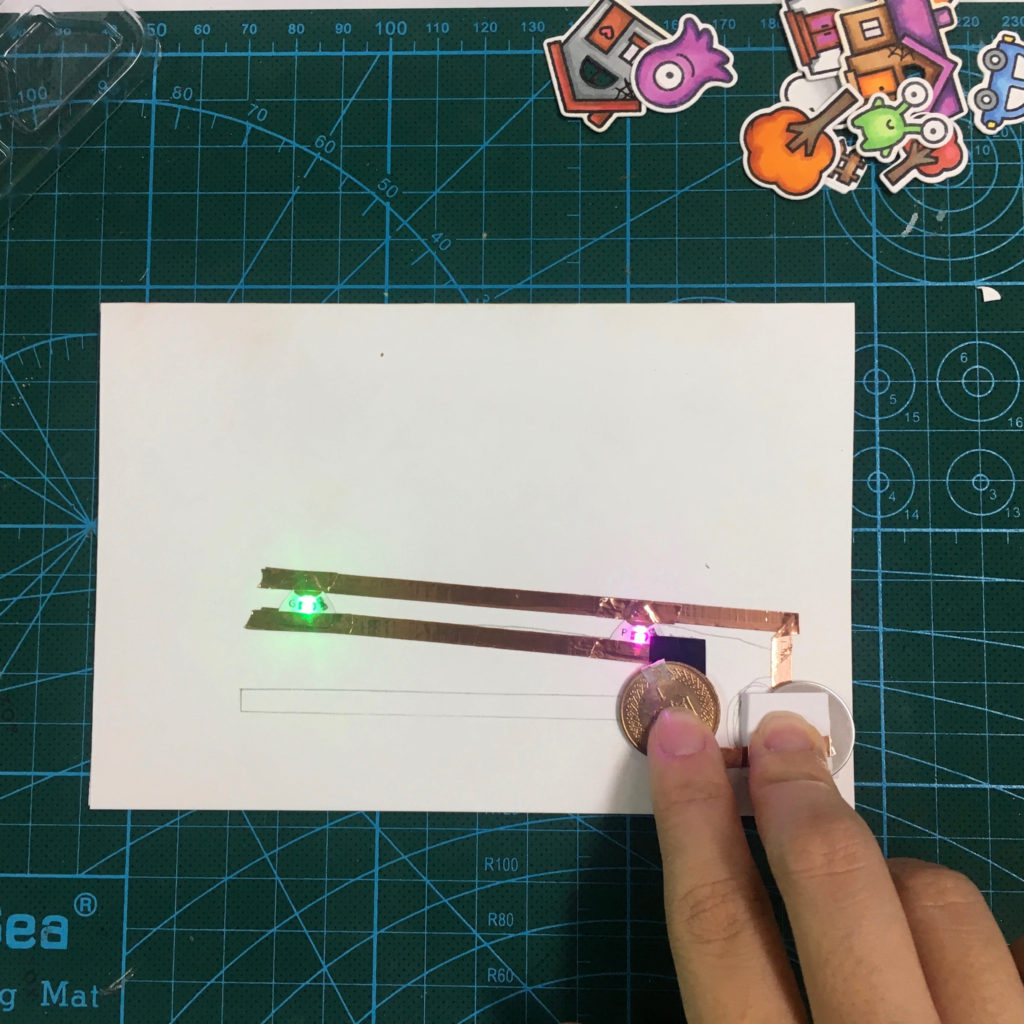
Hi friends, Today I am up on the Chibitronics blog with this adorable fairy friends card showcasing the pressure sensor conductive plastic.
This card is very easy to do. The only different is that I added the new product - pressure sensitive conductive plastic!

I started by creating the inking background with distress inks and blending tools. The little fairy friends, flowers and house are from Lawn Fawn. I stamped them in black, die cut and colored with Copic markers. I also cut tree using die cut.

Like always, the circuit I used is parallel circuit. I put a pressure sensitive conductive plastic on the battery holder. When you press, the light will become brighter the harder you press. This conductive plastic sheet is perfect for making DIY pressure sensors and adding a gentle fade in and fade out effect to your project.


That is all from my side today. Thank you.


Hi, friends, Today I'm going to bring with Springy printable traveler's notebook papers. Click here for everything that's new ...
